One of the best enhancements for high-performance driving is DIY brake ducting—a clever method for fabricating and installing a system that channels cool ambient air to your vehicle’s braking components, primarily the rotors and calipers. This modification is not just a luxury but a necessity for serious drivers. By implementing brake ducting, you can significantly improve thermal management, curb brake fade, and enhance consistent braking performance, especially during the taxing conditions of track days.
What is Brake Ducting and Why is it Essential for Track Performance?
Brake ducting is an aerodynamic airflow management system that directs cool air from the vehicle’s front end straight to its brake system components. This airflow is vital for optimal track performance. When you engage in repetitive high-speed braking, enormous kinetic energy transforms into heat, often soaring beyond 1,000 degrees Fahrenheit in your brake system. This excessive heat build-up leads to brake fade—a temporary yet alarming reduction in braking power that jeopardizes both vehicle control and safety.
Brake fade can reveal itself through a spongy pedal feel or diminished stopping ability. This phenomenon arises from either brake pad fade, where the friction material overheats, creating a lubricating layer that reduces friction, or fluid fade caused by brake fluid boiling due to elevated temperatures, forming vapor bubbles within the hydraulic system that decrease pedal pressure and braking force. A dedicated brake cooling system, including a well-designed brake ducting setup, ensures that your brake components function within their ideal temperature ranges, thus maintaining consistent friction and hydraulic stability while prolonging the lifespan of brake pads and rotors.
How Does Brake Ducting Improve Thermal Management?
By facilitating convection—the most efficient mode of heat transfer for braking systems—brake ducting plays a pivotal role in enhancing thermal management. It works by capturing high-pressure, cool air from the vehicle’s front and guiding it via hoses to the brake rotors and calipers. This continuous flow of cooler air can effectively replace the sluggish, hot air trapped within the wheel well, allowing the brakes to shed heat at a much faster pace.
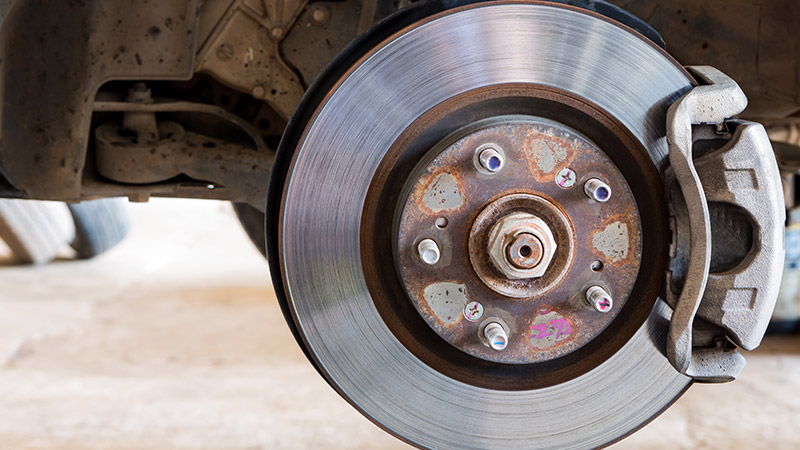
Modern disc brake rotors come equipped with internal vanes akin to fan blades, channeling air from the rotor’s center outwards. By directing cool air to the rotor’s “eye,” or center, you significantly boost this inherent cooling mechanism, promoting airflow through these vanes and expelling hot air. This process not only lowers the average operating temperature of the brakes but also reduces harmful temperature gradients across the disc surface that could initiate cracking. For deeper insights on managing brake fluid temperatures, check out Unlocking Track Potential: The Benefits of High-Temp Racing Brake Fluid.
Components of a DIY Brake Ducting System
A typical DIY brake ducting system consists of three primary components: an inlet, flexible hoses, and spindle adapters or outlets.
- Inlets: These scoops or funnels are mounted in high-pressure areas of the vehicle’s front fascia, such as the bumper, capturing cool ambient air. Common designs include NACA ducts or simple rectangular/round inlets. Their shape should optimize airflow while minimizing aerodynamic drag.
- Hoses: Heat-resistant silicone hoses connect the inlets to the spindle adapters. The diameter of these hoses is crucial; larger diameters, typically 2.5 to 3 inches, significantly increase airflow. Smooth interior facings and optimal routing that minimizes bends are essential for maximum efficiency.
- Spindle Adapters/Outlets: These specially designed or modified components attach to the vehicle’s spindle or dust shield, directing the cool air into the brake rotor or caliper assembly’s center. Properly designed outlets ensure that air is funneled into the rotor’s vanes, enhancing cooling performance.
Brake Ducting Installation Guide: A Step-by-Step Approach
Installing a DIY brake ducting system requires meticulous planning and execution to optimize cooling and ensure safety. Follow this comprehensive guide for a successful installation.
Planning and Material Selection
Begin by identifying suitable inlet locations that capture high-pressure airflow, typically near the center of the front bumper. Choose materials thoughtfully; prioritize heat-resistant silicone hoses over generic dryer hoses. Common tools for installation include tin snips, wrenches (12mm and 14mm), drills, and essential mounting hardware.
Mounting Inlet Ducts
Position the inlet ducts in the chosen high-pressure areas of the bumper or air dam. Cut openings in the bumper slightly smaller than the duct inlets, then secure these ducts using rivets, bolts, or a combination of fastening methods. Ensure a tight fit to prevent movement and enhance air capture efficiency. Additionally, consider installing mesh screens over the inlets to prevent debris from entering.
Routing Hoses
Next, route the flexible cooling hoses from the inlet ducts toward the brake assemblies. Plan the routing to be as direct and short as possible, avoiding any sharp bends or kinks that can impinge on airflow. Be mindful of clearance from suspension components, steering parts, and tires, particularly during full steering lock and suspension travel. Use zip ties or clamps to secure the hoses, ensuring they do not rub against or interfere with moving parts.
Connecting to Backing Plates or Spindle Adapters
To access the brake assembly, lift the vehicle and remove the front wheels, calipers, and rotors. Often, modification or removal of the OEM dust shield is necessary to accommodate the new brake duct outlet. Trim the dust shield using tin snips or a die grinder to create an opening that directs air to the rotor’s center. Fix the spindle adapter or connect the hose directly to a modified dust shield, ensuring that air is blown straight at the rotor’s core. Reinstall the brake rotor and caliper, checking for clearance with the duct components.
Testing and Refinement
Once the installation is complete, conduct thorough visual checks to ensure proper clearance with all moving parts at various steering angles and during suspension compressions. Test the system during spirited driving sessions or a scheduled track day. Monitor brake temperatures using a pyrometer to evaluate effectiveness. You may need to make slight adjustments to hose routing or outlet positioning to further optimize cooling performance. For insights on maintaining overall brake system health, explore Pro Diagnostics at Home: Essential Brake System Diagnostics Tools for DIY Troubleshooting.
Comparative Analysis: Common Brake Ducting Materials
Choosing the right materials for your brake ducting components is vital for ensuring durability, performance, and cost-effectiveness. Here’s a comparative analysis of commonly used materials.
| Material Type | Common Components | Advantages | Disadvantages |
|---|---|---|---|
| Silicone Hose | Flexible cooling hoses | High-temperature resistance (up to 500-600°F), flexible, durable, readily available. | Higher cost than some alternatives, can be bulky. |
| Aluminum | Inlet ducts, backing plates, rigid sections | Lightweight, effective heat dissipation, customizable, strong. | Requires fabrication skills (welding, bending), can be prone to fatigue cracking. |
| Carbon Fiber Composites | Custom inlet ducts, backing plates | Extremely lightweight, high strength-to-weight ratio, aesthetically pleasing. | Very high cost, requires specialized fabrication skills. |
| ABS Plastic | Molded inlets, basic ducts | Inexpensive, easy to work with (cutting, bonding), lightweight. | Lower heat resistance, can become brittle over time, less durable under impact. |
| Fiberglass | Custom inlets, structural components | Cost-effective for DIY, customizable shapes, moderate strength. | Requires careful handling (fibers, resin fumes), can be brittle if not properly reinforced. |
Advantages of Implementing DIY Brake Ducting
Launching a DIY brake ducting system brings several vital advantages for vehicles participating in high-performance driving.
- Reduced Brake Fade: Effectively combating brake fade through active cooling of brake components ensures consistent stopping power throughout demanding sessions—translating directly into enhanced safety and driver confidence. For more strategies, read Brake Fade Prevention: Strategies for Steep Descents and High-Performance Driving.
- Extended Component Lifespan: Keeping operating temperatures lower minimizes thermal stress on brake pads, rotors, and calipers, significantly prolonging their lifespan and reducing the frequency and cost of necessary replacements.
- Improved Stopping Performance: Maintaining brake components within an optimal temperature range allows brake pads to retain their intended friction characteristics, enhancing braking effectiveness and predictability.
- Cost-Effectiveness: DIY brake ducting often proves to be a budget-friendly solution compared to expensive pre-fabricated kits, providing substantial cooling benefits without breaking the bank.
- Customization: Adopting a DIY approach facilitates tailored solutions that follow specific vehicle geometries and performance requirements, optimizing inlet placements and hose routing effectively.
Considerations and Potential Drawbacks
While advantageous, implementing DIY brake ducting presents specific factors and potential drawbacks that warrant detailed consideration.
- Aerodynamic Impact: While useful, front-mounted inlet ducts may introduce additional aerodynamic drag, potentially affecting the vehicle’s overall aero balance and top-speed capabilities. Thoughtful design aims to optimize these factors while maximizing cooling efficiency.
- Debris Ingestion: Open inlet ducts can allow road debris, water, or track gravel to enter the ducting system, potentially harming brake components. Installing mesh screens over the inlets can help mitigate this risk.
- Complexity and Clearance Issues: Routing hoses through crowded engine bays and wheel wells can be tricky, requiring intricate planning to avoid interference with suspension, steering, and tire movement. Mistaken routing may lead to hose damage or impaired vehicle functions.
- Installation Difficulty: The creation of custom mounting brackets and modification of OEM components like dust shields requires a certain degree of mechanical skill and the appropriate array of tools.
- Aesthetics: Some DIY solutions may not seamlessly integrate with your vehicle’s aesthetics, appearing as noticeable aftermarket modifications.
Frequently Asked Questions
What is the primary cause of brake fade on a racetrack?
The primary cause of brake fade on a racetrack is the excessive heat generated during repeated, heavy braking events, which can overwhelm the brake system’s ability to dissipate heat. This heat accumulation leads to a temporary reduction in braking effectiveness due to either changes in the friction material properties (pad fade) or the boiling of the brake fluid (fluid fade).
What materials are recommended for DIY brake ducting to withstand high temperatures?
For DIY brake ducting, heat-resistant silicone hose is highly recommended for flexible ducting due to its capacity to endure temperatures up to 500-600°F. For inlets and backing plates, materials such as aluminum, ABS plastic, or fiberglass are practical choices, with aluminum providing good durability and heat resistance, while ABS and fiberglass are economically suitable for custom designs.
Can brake ducting be installed on any car, or are certain vehicles better suited for it?
Brake ducting can generally be adapted to most vehicles, especially those utilized for performance driving or track days, as any car can benefit from improved brake cooling. While certain makes or models may boast more accessible mounting points or factory provisions, a DIY approach allows for custom solutions tailored for a diverse array of vehicles.